To continue with with my previous post about my mobile installation of my
Kenwood TM-V71A dualband. So we are done figuring out the logistics of actually setup up the remote head. Now on to my method of mounting.
As mentioned I'm driving a
Dodge Nitro SUV. I initially thought that this mobile install was going to be a pain. Actually it's not remotely difficult. Getting power into the cabin from the battery is super easy, opening up the dash is super easy, as is the center console and mounting both parts is easy.
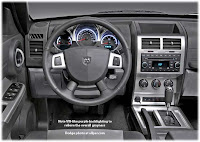 |
| Figure 2 |
Looking at the image to the left, figure 2, you see a picture of a Dodge Nitro dash. With the battery of the SUV being on the left side, drivers side, that is where I focused my efforts in wiring.
Looking at the image to the left, figure 2, you see the speedo cluster, the knee panel, radio area and center console.
1. I failed to snap a picture of the removal of the speed cluster dash area. But it is as follows. Lower the steering wheel all the way down. Firmly grasp the top most forward plastic and pull back towards yourself.

2. Two remove the knee panel that is below the steering wheel. The the top plastic edge of the knee panel exposed, firmly grasp and pull down with even force. Doesn't take much at all. Only two clip hold up the hinged panel. Once it has hinged down as far as it will, slide the panel 3 inches to the left and it comes off.
 |
| Figure 4 |
3. If you look at the shifter there in the front middle off the console.(Figure 3) You see the frame that looks like brushed metal. It is plastic so go easy. If you are in this truck looking down at it, you notice a gap between the shift base and this faux metal area. Insert tips of your fingers and pull up gently. It helps to engage the ebreak.
4. Next if your sitting in the back seat looking a the rear of the center console near the floor you'll see that the back cover is one piece. Very easy, just grasp it and pull slightly. I've included a picture with it removed as I don't have one from before. (Figure 4)
 |
| Wire pass-through |
5. Lastly after popping the hood move to the drivers side, near the brake master cylinder. Look on the firewall under the brake master cylinder and to the right near the fender. In this area there are two pass troughs on the firewall. On my vehicle one is fully in use from the factory but the over merely looks like a rubber plug. Pull the out the plug. No tools needed, it just pulls out. Don't those it.
Disassembly Complete.
To be continued...


 2. Two remove the knee panel that is below the steering wheel. The the top plastic edge of the knee panel exposed, firmly grasp and pull down with even force. Doesn't take much at all. Only two clip hold up the hinged panel. Once it has hinged down as far as it will, slide the panel 3 inches to the left and it comes off.

No comments:
Post a Comment